Check out our full line of miniature branch circuit breakers and supplementary protectors in a wide range of pole sizes, amperage ranges, and trip curves.
Introduction
This paper provides only a general introduction to the subject. It is recommended that any changes to an application be planned and executed by a qualified Electrical Engineer.
What is a Fuse?
A UL listed fuse serves as a circuit protective device. The purpose of a fuse is to make sure an electrical overload doesn’t damage your equipment, wiring, or worse yet burn your building down. Fuses have been around for over a hundred years but the technology has its faults. For one thing, fuses by design sacrifice themselves to protect the electrical circuit. This requires the fuse to be replaced when it is overloaded.
A fuse works something like a light bulb. There are two posts inside with a thin piece of fi lament running between them. When the circuit overloads, that fi lament melts, breaking the circuit and stopping the electrical fl ow. The problem is once that fi lament melts, it’s gone, and the fuse will need to be replaced entirely.
What is a Circuit Breaker?
A UL1077 and UL489 circuit breaker serves as a circuit protective device similar to a fuse. Circuit breakers have been around for over 100 years and their purpose is to make sure an electrical overload doesn’t damage your equipment, wiring, or worse yet burn your building down. When an overload occurs the circuit breaker will “trip” and can be reset by toggling the switch (no replacement is required). Many of us have experienced this in our home when the load from a microwave, coffee pot, crock pot, or hot plate caused a breaker to trip.
Your circuit breaker has current sensing elements to determine when an overload condition occurs, this then opens internal contacts. When this happens, the contacts open and the electrical power is interrupted. To reset a “tripped” circuit breaker simply fl ip it off and then back on. This will close the internal contacts and restore power to the circuit.
How to Reset a Circuit Breaker When Tripped?
Resetting a tripped circuit breaker is a straightforward process, but it’s essential to approach it safely. Begin by identifying the tripped breaker in your panel; it will be in a middle position between "On" and "Off." Before resetting, unplug or turn off the devices connected to the circuit to prevent overloading when power is restored. Firmly push the breaker to the "Off" position until it clicks, then switch it back to "On." If the breaker trips again immediately, it indicates a persistent issue like an overload, short circuit, or faulty breaker, and professional inspection is required.
What’s the Difference Between Circuit Breakers & Fuses?
Circuit breakers and fuses are both designed to protect electrical systems, but they operate differently. A fuse is a single-use device containing a thin wire that melts when the current exceeds its rating, breaking the circuit. In contrast, a circuit breaker is a reusable switch that trips open when it detects overloads or faults. Breakers are more convenient, as they can be reset rather than replaced after tripping, and they often integrate advanced features like arc fault or ground fault protection. Fuses, however, are more sensitive to surges and may provide faster response in certain cases, making them ideal for specific applications.
Why Replace Fuses?
The primary reasons for replacing a fuse with a circuit breaker in a control panel are for convenience and operating cost. When a breaker trips, the “repair” is as simple as flipping a switch. But when a fuse is blown, the entire fuse needs to be replaced. Having a spare fuse on hand is recommended. Make certain you turn the power off to your control panel before replacing the fuse.
Additional reasons for replacing a fuse and fuse block with a circuit breaker are:
- Ease of reset
- Operating cost, this is the cost over time
- Reduced troubleshooting time
- Reduced repair cost
- Reset while unit has power applied with little risk for an arc fl ash event to occur
Fuses have lower up-front costs versus circuit breakers. However, if you’re replacing fuses frequently circuit breakers provide a better alternative for cost savings and will more than pay for themselves in a short period of time.
When Replacing Fuses with a Circuit Breaker
Before you begin replacing fuses with a circuit breaker it is important to check your local building codes. A permit and inspection may be required prior to replacement. The inspector is referred to as the AHJ (Authority Having Jurisdiction) in the NEC, CSA and IEC standards.
- The first step is to plan the work you are attempting to perform. If a permit is required, this plan is necessary.
- The second step is to perform the work.
- The third step is to have the work inspected by the AHJ or plant engineer.
How Much Does It Cost To Replace A Circuit Breaker?
The cost to replace a circuit breaker depends on several factors, including the type of breaker, labor rates, and the complexity of the replacement. Basic standard breakers typically cost between $20 to $50 per unit, while specialized breakers, such as GFCI or AFCI, can range from $50 to $150. Professional labor adds another $150 to $300, depending on the service provider. For complex systems or high-amperage breakers, costs may be higher. It’s important to hire a licensed electrician to ensure safety and compliance with electrical codes.
Safety First
When you are ready to perform the work, safely disconnect and verify the electrical power to the control panel has been disconnected. All plant and local safety requirements are to be followed, including Personal Protective Equipment (PPE) and Lock Out/Tag Out (LOTO).
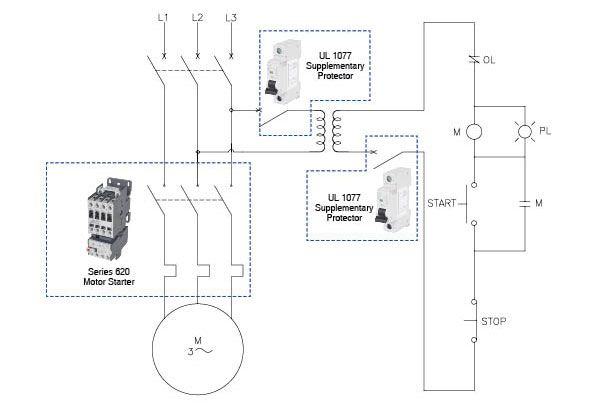
Select Circuit Breakers
Selecting the proper sized circuit breaker is an important step in this process. The control wiring is dependent on the circuit protective device to protect it from overload. The supplemental breaker (UL1077 or UL489) can protect the loads similar to a UL listed fuse. Sizing the breaker is based on the circuit load and ampacity of the wire. The load is typically much less than the ampacity of the wiring. Therefore, the load will typically determine the size of the circuit protective device.
NEC Article 430 provides a one-line diagram to explain overcurrent protection. Figure 430.1 shows the components of a motor circuit.

The motor overload protection device, #5 in the diagram, protects the motor and the branch-circuit conductors. Motor overload devices do not respond immediately to the over current conditions from typical motor operation, brief overload conditions, or motor start up when inrush current can be anywhere from 6-8 times the full load current. The motor overload device protects the motor and the branch-circuit conductors. The overloads are typically sized 115% or 125% of the nameplate full-load rating of the motor and up to 130% or 140% with exceptions. See 430.32(A)(1), 430.32(C), 430.6(A)(2). (Source: Jade Learning)
Motor full-load current tables and NEC Table 430.52 are used to determine the maximum for the branch short circuit and ground-fault protection devices. Nontime Delay Fuses, Dual Element (Time Delay) Fuses, Instantaneous Trip Circuit Breakers and Inverse Time Circuit Breakers are used as short-circuit and ground-fault protection devices. When migrating from Circuit Protection Fuses to Circuit Protection Breakers, you must consider the percentage of full load current of the motor. In order to properly determine this, you need to know the motor type, horsepower, and supply voltage.
Required Tools
Below is a list of tools that may be required:
- Personal protective equipment (used to verify the voltage has been removed)
- Proper LOTO lock and/or tag
- Digital volt meter or non-contact voltage detector
- Screw drivers, which may include philips, fl at, torx, and square
- Wire stripper for the line and load wires
- Drill motor
- Drill bit sized for the DIN rail mounting screws (note, do not use thread cutting screws)
Shut Off Your Power
Start by removing all electrical power to your control panel. If the control panel is fed by a dead front disconnect switch, enable the off position and perform the proper LOTO to ensure electrical power is not inadvertently reapplied. Control power can come from an external source. If there is foreign power the wiring should be orange or yellow so always verify the power is removed with a digital volt meter or non-contact voltage detector.
Removal Fuse Block
You are now ready to start work on your control panel. It is important to keep track of each circuit, to do this mark both the line and load side of the wires by circuit. Typically this is a number or letter sequence for both line and load. The fuse size should be noted as well. Then remove the existing fuse block(s) from the back panel.
Mounting of Circuit Breaker
Circuit breakers are typically DIN rail mounted, so please ensure there is a space and a location on the sub-panel for mounting. As always follow the manufacturer’s guidelines and instructions for mounting, wire stripping and proper terminal torques. The line or load cable can be cut if it is too long and if it is too short it should be replaced. Note that the wiring can be spliced if replacement is not feasible.
Wiring the Control Circuit Breaker
When wiring the circuit breaker in the panel use the following:
- Ensure the circuit breaker is mounted and sized properly, these can be UL1077 or UL489 breakers.
- Ensure all ground wires are connected. In the USA these can be bare copper, green or green with a yellow strip.
- Connect the incoming power to the line side of the breaker, following all manufacturer installation instructions, proper tools, and proper torque.
- Connect the load side wiring to the breaker, following all manufacturer installation instructions, proper tools, and proper torque.
Testing and Power Up
- Prior to re-applying power to the control panel ensure all connections are torqued to the manufacturers’ specifi cations, this may vary by the cable size.
- It is good practice to perform a pull test on all wire connections. This ensures the wire connections are secured.
- With all of the switches and push buttons in the “off ” position apply power to the control panel.
- Turn on the control power and verify the control circuit works properly.
- Last you can start the system performing any start up testing.
What are the Signs that a Circuit Breaker Needs to be Replaced?
Circuit breakers are probably among the many ways to ensure good electrical safety at work or in homes. But with time, the chances are that they may require a change. Here is what to look for:
Heat Buildup
If you find your circuit breaker very warm or even hot to the touch, this clearly indicates a problem. The high temperature coming from the breaker may be a sign of overworking and the incapability to handle the load.
Burning Smell
If you get a burning smell around the breaker box, take this as a critical warning sign. This usually points toward the internal parts having overheated or started to burn, which, in turn, can lead to a fire.
Visible Damage
Observe for visible damages from burnt marks around the breaker and wiring. Inspect any wires attached to the breaker for damage, as this could lead to future issues and compatibility problems.
Performance Issues
Breakers that repeatedly trip for no apparent reason or fail to trip when needed are malfunctioning and should be replaced.
This way, you safeguard your electrical system and ensure its proper operation. And if ever there are any problems, consult a licensed electrician to see if you need new circuit breaker installation.
What Should You Do if a Circuit Breaker Replacement Does Not Solve the Problem?
Check Associated Electrical Equipment: The first step is to examine any equipment attached to the circuit. A device, or other piece of electrical equipment, that is not working properly can cause constant issues. One should remove each of the devices one by one and test the circuit in order to identify an item that is problematic.
Check for connections: All wires and connections of the circuit must be done securely with no loose ends. Loose wires cause problems from time to time that could look like the circuit breakers aren't functioning.
Evaluate Entire Circuit: Inspect the general condition of the wiring. Wiring in poor condition may have caused issues. Wiring that is loose, burned, or discolored may mean that the whole circuit needs to be properly addressed.
Circuit Tester: You can use a multimeter or circuit tester to find out if the current and voltage flow constantly within the circuit. It is going to show where the electricity flow is being interrupted.
Expert Guidance from c3controls
If you are replacing your fuse system with a circuit breaker in your control panel contact c3controls for help in properly selecting and sizing of the circuit breaker. For additional information on circuit breakers please see A Quick Guide: UL489 or UL1077 in Control Panels and Equipment. We can help you make sure you have everything under control with your electrical system. Shop our circuit breakers to get the right breaker for you today.
--------------------
Disclaimer:
The content provided in this white paper is intended solely for general information purposes and is provided with the understanding that the authors and publishers are not herein engaged in rendering engineering or other professional advice or services. The practice of engineering is driven by site-specifi c circumstances unique to each project. Consequently, any use of this information should be done only in consultation with a qualifi ed and licensed professional who can take into account all relevant factors and desired outcomes.
The information in this white paper was posted with reasonable care and attention. However, it is possible that some information in these white papers is incomplete, incorrect, or inapplicable to particular circumstances or conditions. We do not accept liability for direct or indirect losses resulting from using, relying or acting upon information in this white paper.
ISO 9001:2015
Certified
17+ Million Product
Configurations
Lifetime
Warranty
Guaranteed
Same-Day Shipping
Advantage Pricing
Save Up To 40%
c3controls Headquarters, USA
664 State Avenue
Beaver, PA 15009